How to Install Python for AI: Complete Beginner Guide (Windows, Mac, Linux)
Step-by-step Python 3.12 installation guide for AI tools, local LLMs, and automation. Setup for Windows, macOS, and Linux — no coding experience needed.

Python is the language that powers 90% of AI tools, local LLMs, and automation scripts. Whether you want to run Ollama, set up LM Studio, build a chatbot, or use an API, you'll need Python installed first.
This guide walks you through installing Python 3.12 step-by-step on any operating system — Windows, macOS, or Linux. No coding experience needed.
Why Python for AI?
Before you install, here's why Python matters for AI work:
Python is everywhere in AI. OpenAI's API libraries, Anthropic's SDK, Ollama scripts, Langchain, LM Studio, and almost every local AI tool use Python. If you want to automate anything with AI, Python is the bridge.
It's beginner-friendly. Python reads almost like English. You don't need to compile code or wrestle with complex syntax.
Package management is simple. Python's package manager (pip) lets you download tools with one command. No hunting for DLLs or managing dependencies manually.
Most tutorials assume you have it. Any "how to use Claude API" or "how to run Llama locally" guide will mention Python without explaining the install. That's what this guide fixes.
Step 1: Download Python 3.12
Go to python.org/downloads.
You'll see a big yellow button that says "Download Python 3.12.x" (or whatever the latest LTS version is). Click it.
Why 3.12? It's the current Long-Term Support version, meaning it'll get security updates for years. It's stable and compatible with all major AI libraries.
For Windows: You'll download an .exe installer.
For macOS: You'll download a .pkg installer.
For Linux: You may already have Python installed, but we'll verify later.
Step 2: Run the Installer (Different for Each OS)
Windows
- Open the downloaded
.exefile - Important: Check the box that says "Add Python to PATH" — this is critical
- Click "Install Now" or customize if you know what you're doing (most people: click "Install Now")
- Wait for it to finish
- Click "Disable path length limit" (optional but recommended)
- Done
macOS
- Open the downloaded
.pkgfile - Follow the installer prompts
- It will ask you to agree to a license — click "Agree"
- Choose an installation location (default is fine)
- Enter your Mac password when prompted
- Wait for it to finish
If you prefer using Homebrew (Mac package manager):
brew install python@3.12
Linux (Ubuntu, Debian, Fedora)
Most Linux systems come with Python. Check if you already have it:
python3 --version
If it's 3.12 or later, you're done. If it's older, update:
Ubuntu/Debian:
sudo apt update
sudo apt install python3.12
Fedora:
sudo dnf install python3.12
Step 3: Verify Python Installed Correctly
Open a terminal or command prompt and type:
python --version
You should see something like: Python 3.12.1
If you get "command not found" or the wrong version:
- Windows: Uninstall Python and reinstall with "Add to PATH" checked
- Mac: Try
python3 --versioninstead - Linux: You may need to use
python3instead ofpython
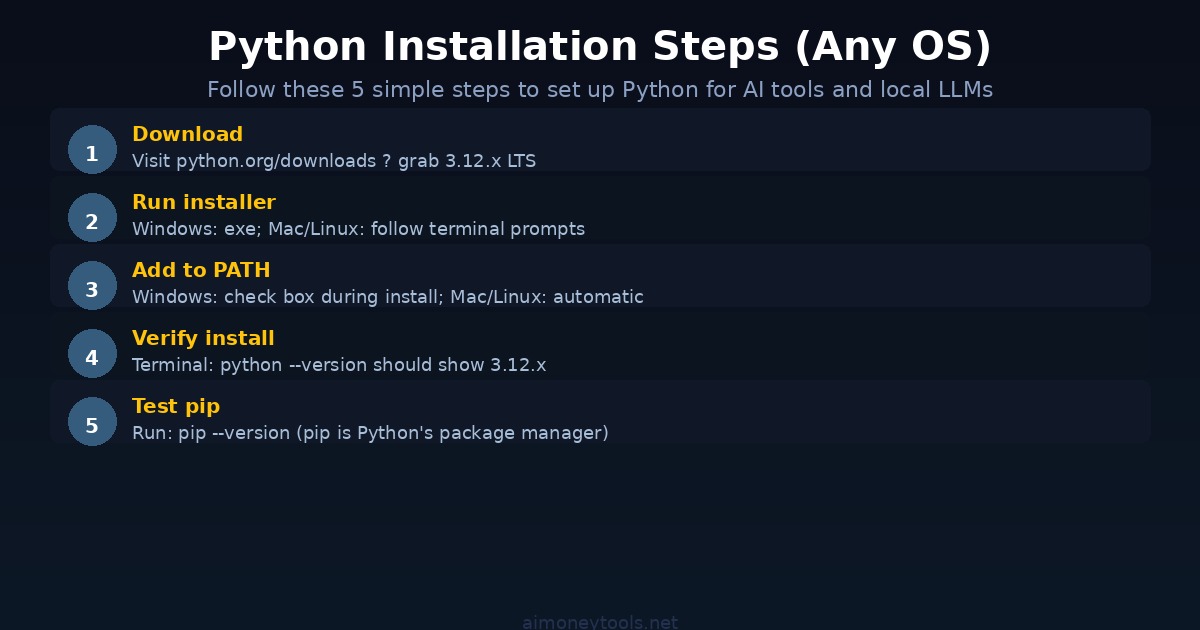
Step 4: Verify pip (Package Manager)
Type this command:
pip --version
You should see: pip 24.x.x from ...
If you don't, something went wrong with the install. On Windows, try pip3 instead of pip.
What Are Virtual Environments?
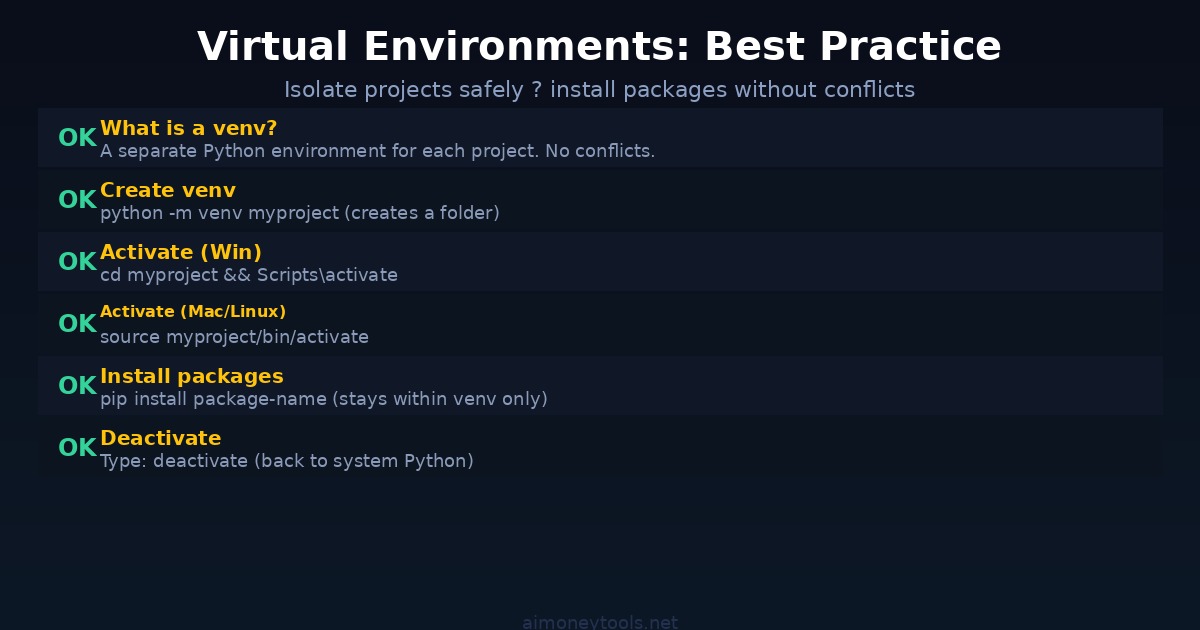
Here's a critical concept: virtual environments isolate your Python projects from each other.
Imagine you have two projects — one uses a tool that needs Langchain version 0.1, the other needs version 0.3. Without virtual environments, they'd conflict. A venv lets each project have its own separate Python "container."
Why this matters: If you install packages directly into system Python, you can accidentally break things across different projects.
Creating Your First Virtual Environment
Navigate to where you want your project folder to live. For example, on Windows, open Command Prompt and navigate to your Documents folder:
cd Documents
Then create a virtual environment:
python -m venv myai_project
This creates a folder called myai_project.
Activate Your Virtual Environment
Windows:
myai_project\Scripts\activate
macOS / Linux:
source myai_project/bin/activate
If it worked, you'll see (myai_project) at the start of your terminal line.
Install Packages Inside the venv
Now you can install anything without worrying about breaking your system Python:
pip install package-name
For example:
pip install openai
or
pip install langchain
Deactivate When Done
Type:
deactivate
The (myai_project) prefix disappears, and you're back to system Python.
Common Issues & Fixes
"Command 'python' not found"
- Windows: Uninstall and reinstall with "Add to PATH" checked
- Mac: Use
python3instead, or reinstall via Homebrew - Linux: Use
python3instead
"pip is not recognized"
- Try
pip3instead ofpip - Or:
python -m pip install package-name
I'm getting permission errors on Mac/Linux
- Don't use
sudowith pip — use a virtual environment instead - If you must:
pip install --user package-name
My old Python version won't update
- Windows: Uninstall via Control Panel, then reinstall 3.12
- Mac: Use Homebrew:
brew install python@3.12 - Linux: Use your package manager's latest version
Next Steps: Using Python for AI
Once Python is installed, you're ready for:
- Running local LLMs with Ollama
- Using Claude API with Python
- Building chatbots with CustomGPT
- Setting up LM Studio
- Exploring the OpenAI API
For GPU acceleration on local AI work, Ampere is a solid option if you need cloud compute.
Key Takeaways
- Python 3.12 is the current standard for AI work
- Always check "Add to PATH" on Windows during install
- Virtual environments keep projects isolated — use them
- Verify your install with
python --versionandpip --version - If something breaks, check the Common Issues section above
FAQ
What version of Python do I need?
Python 3.12 is the latest LTS version and fully compatible with all AI libraries. You can use 3.11 or 3.10, but 3.12 is recommended. Avoid Python 2 — it's obsolete.
Do I need to be an admin to install Python?
Yes, on Windows and Mac you need admin rights. On Linux with sudo, you need sudo privileges.
What's the difference between python and python3?
On older systems, python refers to Python 2 (obsolete). python3 refers to Python 3.x. Modern installs usually make python point to 3.x, but python3 always works.
Do I have to use virtual environments?
No, but you should. They prevent package conflicts. It's like having a separate Python installation for each project — clean and safe.
Can I have multiple Python versions installed?
Yes. You can have Python 3.12 and 3.11 installed at the same time. Just use python3.11 to run the older version specifically.
What does "Add to PATH" do?
It makes Python accessible from any terminal or command prompt, anywhere on your computer. Without it, you can only run Python from the install folder.
I'm on Mac and Python isn't working. What do I do?
Try python3 instead of python. If that works, you have Python 3 but python is aliased to Python 2. Either use python3 every time, or install via Homebrew: brew install python@3.12.
How do I uninstall Python?
Windows: Control Panel > Programs > Programs and Features > find Python > Uninstall.
Mac: If via installer, delete the install folder. If via Homebrew: brew uninstall python@3.12.
Linux: sudo apt remove python3.12 (Ubuntu/Debian) or sudo dnf remove python3.12 (Fedora).
Is Python 3.12 free?
Completely free. Open source. No license fee.

Alex the Engineer
•Founder & AI ArchitectSenior software engineer turned AI Agency owner. I build massive, scalable AI workflows and share the exact blueprints, financial models, and code I use to generate automated revenue in 2026.
Related Articles
How to Build and Sell AI Voice Receptionists to Local Businesses in 2026
A beginner's guide to building AI voice agents that answer business phone calls — the tools to use, what to charge, and how to find your first client.

How to Make Money on Fiverr with AI Tools in 2026: 7 Gigs You Can Start This Week
Discover 7 real Fiverr gigs you can launch using free and low-cost AI tools in 2026 — no experience required. Real pricing data, step-by-step setup, and tools that actually work.

How to Make Money with AI Tools in 2026: 7 Proven Methods for Beginners
New to AI and wondering how to turn it into income? Here are 7 proven methods beginners are using in 2026 — with the exact tools, realistic earnings, and how to start this week.