How to Install ComfyUI for Flux.1 Image Generation (Complete Guide)
Step-by-step guide to install ComfyUI with Flux.1 for unlimited AI image generation on Windows, Mac, and Linux. No API costs.

ComfyUI is a node-based interface for Flux.1 image generation. Unlike web tools (Midjourney, DALL-E), ComfyUI runs entirely on your computer — no monthly subscription, unlimited generations, complete privacy.
But the installation looks intimidating: CUDA, Python, git clone, model downloads. The average beginner sees a terminal and quits.
This guide walks you through every step. By the end, you'll be generating photorealistic images without paying per-use.
What is ComfyUI?
ComfyUI is an advanced interface for AI image generation. It's node-based (not chat-based), which means:
- Beginners: Visual workflow replaces code
- Advanced users: Full control over sampling, LoRAs, control nets
- Power users: API integration for automation
Flux.1 is Black Forest Labs' latest image model (March 2026). It generates:
- Photorealistic images (human hands, complex scenes, real emotions)
- Artistic styles (oil painting, watercolor, digital art)
- Text rendering (readable text inside images)
- Complex compositions (multiple subjects, correct physics)
Why ComfyUI + Flux.1 instead of web tools?
| Feature | ComfyUI (Local) | Midjourney | DALL-E 3 | Stable Diffusion |
|---|---|---|---|---|
| Cost | Free (one-time setup) | $12–96/month | $15/month | Free (limited credits) |
| Generations | Unlimited | 900 min/year | ~30/month included | Limited |
| Speed | 2-8 sec (RTX 3060 up) | 1 min | 30 sec | Varies |
| Privacy | Images stay local | Stored by Midjourney | Stored by OpenAI | Varies |
| Control | 100% (nodes) | Limited | Limited | Medium |
| Photorealism | Excellent (Flux) | Good | Very good | Good |
Verdict: ComfyUI is best for creators who want unlimited, free image generation without monthly fees.
Prerequisites
You need:
- Windows 11 / macOS / Linux (ComfyUI runs on all)
- GPU with 8GB+ VRAM (Nvidia RTX 3060 / M1 Pro minimum)
- Check:
nvidia-smion Windows/Linux, or Activity Monitor → GPU on Mac
- Check:
- 50GB free disk space (Flux.1 model + dependencies)
- Python 3.10 or later (pre-installed on Mac)
- 15 minutes (first time only)
No GPU? Skip this guide. Flux.1 needs hardware acceleration. CPU rendering is 100x slower.
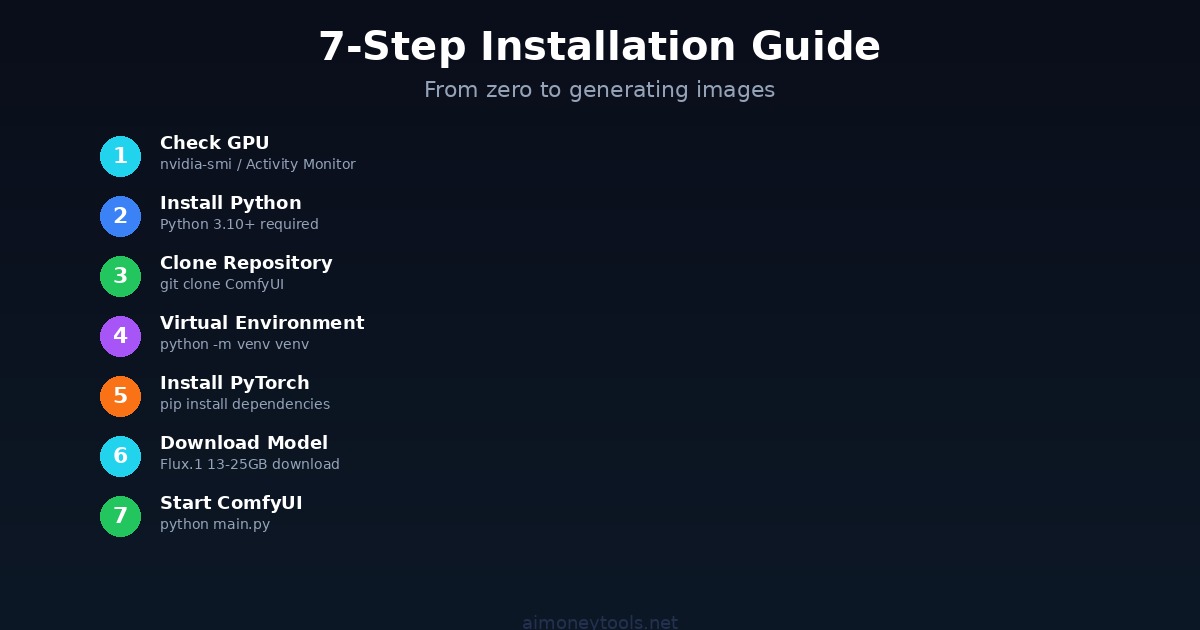
Step 1: Check Your VRAM
Before installing, confirm your GPU has enough memory.
Windows (Nvidia):
nvidia-smi
Look for "Memory" — need at least 8GB VRAM.
Mac: Open Activity Monitor (Cmd+Space → Activity Monitor) → GPU tab → check available VRAM.
Linux:
nvidia-smi
If you see "command not found", your GPU drivers aren't installed. Install them first.
Not enough VRAM? You have options:
- Flux Schnell (faster, lower quality) — uses 6GB VRAM
- Optimize with smaller batch sizes (slower generation, but works on 4GB)
- Run on a cloud GPU (cheaper than Midjourney for heavy users)
Step 2: Install Python & Git
ComfyUI requires Python 3.10+ and Git.
Windows:
- Download Python 3.11 from python.org
- Check "Add Python to PATH" during install (critical!)
- Restart your computer
- Open Command Prompt and verify:
python --version
- Download Git from git-scm.com
- Install with default settings
- Restart
macOS:
# Install Homebrew first (if not already installed)
/bin/bash -c "$(curl -fsSL https://raw.githubusercontent.com/Homebrew/install/HEAD/install.sh)"

# Install Python and Git
brew install python@3.11 git

# Verify
python3 --version
git --version
Linux (Ubuntu/Debian):
sudo apt update
sudo apt install python3.11 python3.11-venv git
python3.11 --version
Step 3: Clone ComfyUI Repository
Open your terminal and navigate to where you want ComfyUI installed (e.g., Desktop or Documents).
git clone https://github.com/comfyanonymous/ComfyUI.git
cd ComfyUI
This downloads ComfyUI (about 2GB).
Step 4: Create Virtual Environment
A virtual environment isolates dependencies (prevents conflicts with other Python projects).
python -m venv venv
Activate it:
- Windows:
venv\Scripts\activate - Mac/Linux:
source venv/bin/activate
You should see (venv) at the start of your terminal line. Good.
Step 5: Install Dependencies
With the virtual environment active:
pip install -r requirements.txt
pip install torch torchvision torchaudio --index-url https://download.pytorch.org/whl/cu118
This installs PyTorch with CUDA support (enables GPU acceleration).
If you get an error, try:
pip install torch torchvision torchaudio --index-url https://download.pytorch.org/whl/cu121
(Different CUDA versions for different GPU drivers.)
Wait 5–10 minutes. Installation is slow the first time.
Step 6: Download Flux.1 Model
ComfyUI needs the actual Flux.1 model files. These are large (13–25GB depending on precision).
Option A: Automatic Download (ComfyUI does it on first run)
- Easiest method
- Takes 5–10 minutes on first launch
Option B: Manual Download (recommended for large models)
- Download from Hugging Face: https://huggingface.co/black-forest-labs/FLUX.1-dev
- Extract to:
ComfyUI/models/checkpoints/
For beginner setup, use Option A — ComfyUI will download automatically.
Step 7: Start ComfyUI
In your terminal (with venv active):
python main.py
Wait 30–60 seconds.
You should see:
Prompt server starting on 127.0.0.1:8188
Go to http://127.0.0.1:8188
Open that URL in your browser. ComfyUI interface loads — you're done!
First run will take 2–5 minutes as it downloads the Flux.1 model.
Step 8: Generate Your First Image
In the browser interface:
- Right-click on the canvas → "Add Node"
- Add a "Load Checkpoint" node
- Select "FLUX.1-dev" from the dropdown
- Add a "CLIP Text Encode" node (for prompts)
- Add a "KSampler" node (controls quality, steps, etc.)
- Add a "VAE Decode" node
- Add a "Save Image" node
- Connect them in order (green dots to green dots)
- Type your prompt: "A photorealistic astronaut on Mars, cinematic lighting, 8K"
- Click "Queue Prompt"
Generation starts. First image takes 60–120 seconds on RTX 3060.
Output images save to: ComfyUI/output/
Common Issues & Fixes
Issue: "No module named 'torch'"
Fix: Reactivate venv + reinstall:
source venv/bin/activate  # Mac/Linux
pip install torch --index-url https://download.pytorch.org/whl/cu121
Issue: "CUDA out of memory"
Fix: Reduce batch size or model precision:
- In ComfyUI settings, reduce "batch_size" to 1
- Or use Flux Schnell (smaller model, faster, uses less VRAM)
Issue: "Connection refused" when opening 127.0.0.1:8188
Fix: ComfyUI didn't start. Check terminal for errors. Common causes:
- Port 8188 already in use (change with
--port 8189) - Python not in PATH (reinstall with "Add to PATH" checked)
- Missing dependencies (reinstall requirements.txt)
Issue: Image generation is very slow (>5 min per image)
Cause: GPU not accelerating (running on CPU). Fix: Verify GPU detection:
python -c "import torch; print(torch.cuda.is_available())"
Should print True. If False, your GPU isn't detected. Reinstall GPU drivers.
Issue: Out of disk space
Cause: Flux model is 13–25GB. Fix: Delete old models or move ComfyUI to a larger drive.
Pro Tips
Tip 1: Use Custom LoRAs for Consistent Style
Download LoRAs (style/character models) from CivitAI and place in ComfyUI/models/loras/. Load with a "Load LoRA" node.
Tip 2: Control Image Generation with ControlNet
Use ControlNet to constrain composition (pose, depth, edges). Nodes available in ComfyUI interface.
Tip 3: Batch Generate (Create Variations)
Set batch_size to 4 in KSampler. ComfyUI generates 4 images per prompt.
Tip 4: Use GPU-Optimized Precision
Flux dev: 16-bit precision (default, good quality, ~24GB VRAM) Flux schnell: 8-bit quantization (faster, ~8GB VRAM, lower quality)
Tip 5: Organize Outputs
ComfyUI saves images with timestamps. Create folders (e.g., /output/portraits/, /output/landscapes/) to organize.
Monetization Paths
Path 1: Sell Generated Images
- Etsy: Print-on-demand posters, digital downloads
- Stock sites: Adobe Stock, Shutterstock (if license permits)
- Fiverr: Offer custom AI art generation ($25–200 per order)
Path 2: Build AI Art Agency
- Create custom Flux workflows for clients
- Offer unlimited image generation ($500–2000/month retainer)
- Use CustomGPT to build a chatbot that sells your services
Path 3: Teach Others
- YouTube channel: ComfyUI tutorials, Flux tips
- Gumroad course: "ComfyUI Mastery" ($30–50 per student)
- Community: Build Discord for ComfyUI users (monetize with premium tier)
FAQ
Can I use ComfyUI without a GPU?
No. Flux.1 requires GPU acceleration. CPU rendering is 200x+ slower (1 hour per image). Use Midjourney or DALL-E instead.
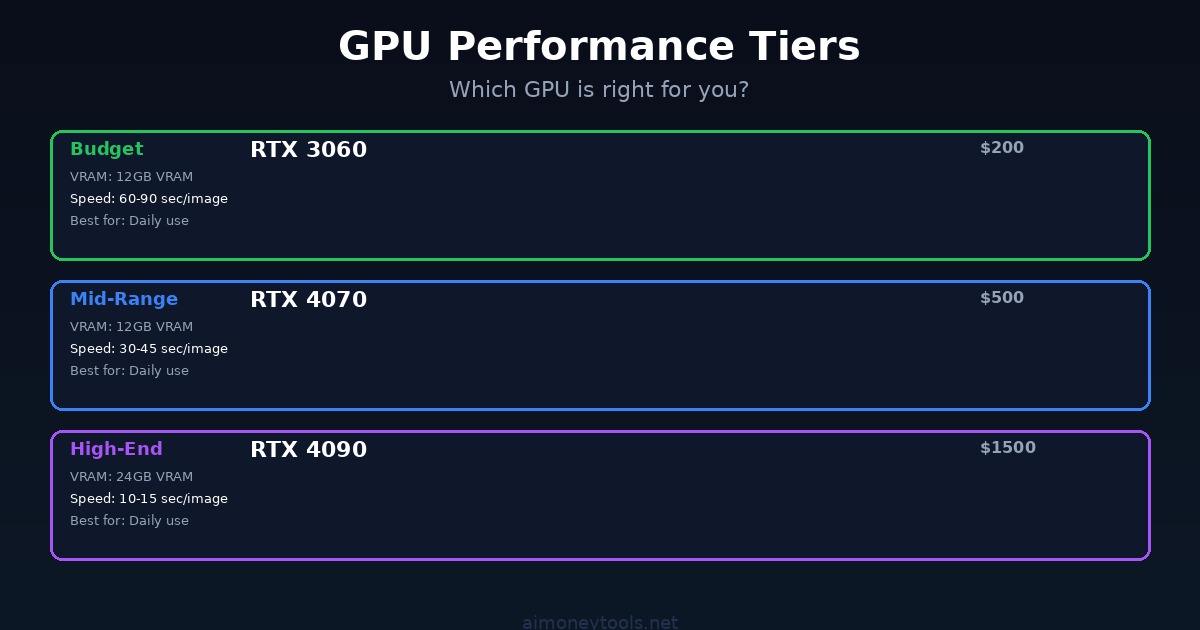
Which GPU is best for Flux?
- Budget (~$200): RTX 3060 (12GB VRAM) — generates 1 image every 60–90 sec
- Mid-range (~$500): RTX 4070 (12GB) — 1 image every 30–45 sec
- High-end (~$1500): RTX 4090 (24GB) — 1 image every 10–15 sec
Is it legal to sell Flux-generated images?
Yes. The Flux.1 license permits commercial use. Check Black Forest Labs terms before selling.
How much does it cost to run ComfyUI long-term?
- Hardware cost: $200–2000 (one-time)
- Electricity: ~$0.50–5 per month (depending on GPU usage)
- Software: Free
Compare to Midjourney ($12–96/month, no upfront cost).
Can I run ComfyUI on Mac?
Yes, but slower than Nvidia GPUs. M1/M2 Pro runs Flux.1, but expect 2–3x slower speeds than RTX 3060.
Should I learn ComfyUI or Midjourney?
- Midjourney: Easy, fast, cloud-based. No setup. Start here if you're not technical.
- ComfyUI: Steeper learning curve, unlimited potential, full control. Choose if you want to build a business or need custom workflows.
What if my model doesn't generate images?
Check the terminal for errors. Common causes: missing nodes, incorrect connections, insufficient VRAM. Screenshot the workflow + error and post to ComfyUI GitHub issues.
Next Steps
- Install ComfyUI (follow steps 1–7 above)
- Generate 10 images (experiment with prompts)
- Explore LoRAs (customize style)
- Learn advanced workflows (check YouTube tutorials)
- Monetize (choose one of the 3 paths above)
Related Articles

Alex the Engineer
•Founder & AI ArchitectSenior software engineer turned AI Agency owner. I build massive, scalable AI workflows and share the exact blueprints, financial models, and code I use to generate automated revenue in 2026.
Related Articles

How to Start an AI-Assisted Resume Writing Side Hustle in 2026 (Beginner's Guide)
A step-by-step guide to using AI resume tools to offer a paid resume and cover letter writing service — what to charge, which tools to use, and how to find your first clients.

How to Build and Sell AI Voice Receptionists to Local Businesses in 2026
A beginner's guide to building AI voice agents that answer business phone calls — the tools to use, what to charge, and how to find your first client.

How to Make Money on Fiverr with AI Tools in 2026: 7 Gigs You Can Start This Week
Discover 7 real Fiverr gigs you can launch using free and low-cost AI tools in 2026 — no experience required. Real pricing data, step-by-step setup, and tools that actually work.