How to Install and Use Groq API: Beginner's Step-by-Step Guide
Learn how to install Groq API, set up your first request, and use Groq's LPU technology for instant AI inference. Complete beginner tutorial with Python examples.

Groq is a platform that makes AI models run incredibly fast — sometimes 10x faster than competitors. If you've tried ChatGPT or Claude and thought "this is slow," Groq fixes that problem using specialized hardware called LPU (Language Processing Unit).
Groq is free to use for developers. You can run thousands of API calls without paying a cent (generous free tier). This guide walks you through getting started in 5 minutes.
Why Use Groq Instead of OpenAI or Claude API?
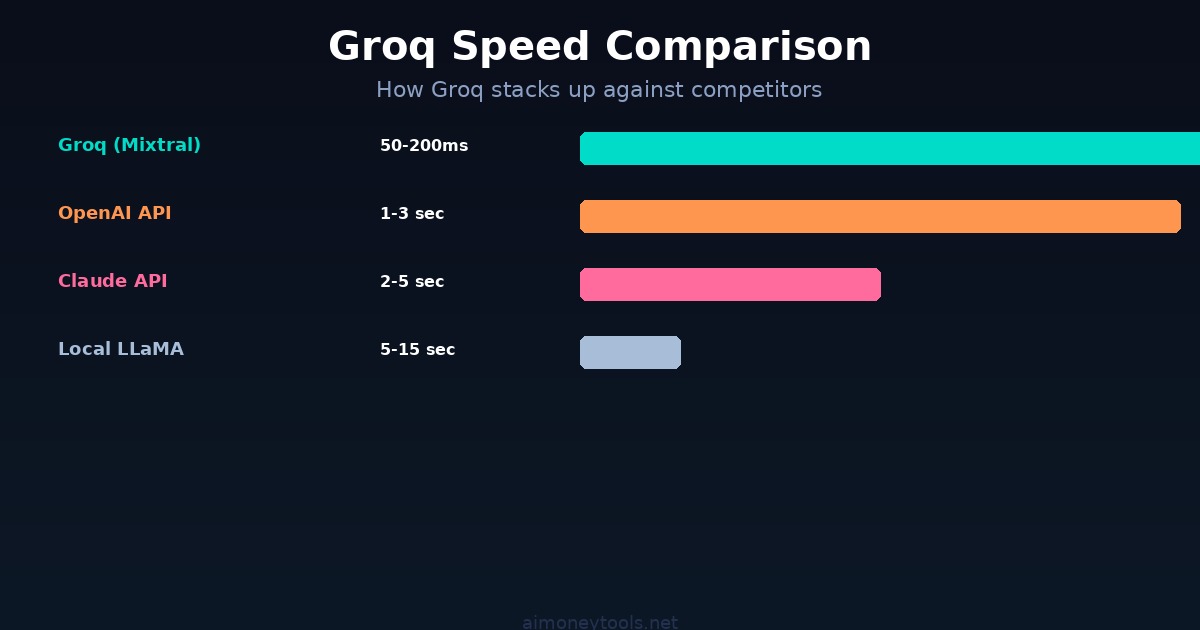
Speed: Groq's LPU was built for language models. Responses come back in milliseconds instead of seconds. This matters for real-time applications — chatbots, code generation, live transcription.
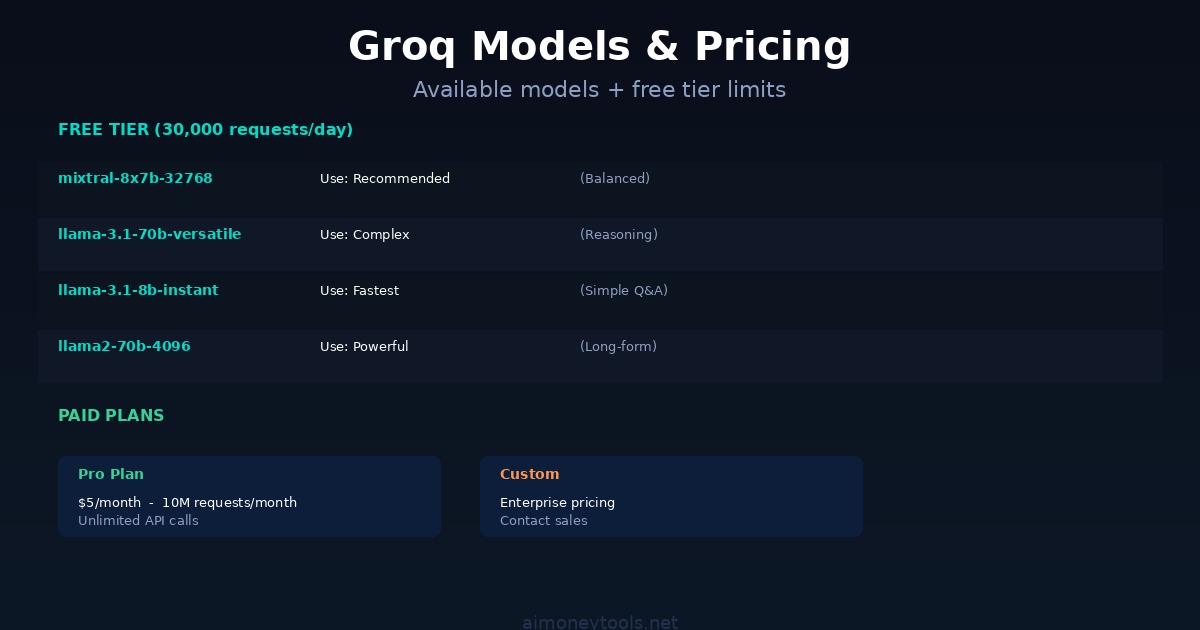
Free Tier: 30,000 requests per day for free. That's enough for serious development work.
Affordable: Even with paid plans, Groq is cheaper than OpenAI. $0.0005 per token for Mixtral 8x7B (vs $0.015 per token for GPT-4o input).
Open Models: Groq uses open-source models like Mixtral 8x7B and LLaMA 3 70B. You're not locked into proprietary systems.
No Rate Limiting on Free Tier: You get 30,000 requests per day without worrying about burst limits.
Real-World Use: Groq works for coding, writing, summarization, translation, reasoning. If you can use ChatGPT for it, Groq works too.
Step 1: Sign Up for Groq (Free)
- Go to console.groq.com
- Click "Sign Up"
- Enter your email and create a password
- Verify your email (check your inbox)
- You're done — no credit card needed
That's it. Your free tier is active immediately.
Step 2: Create an API Key
- After signing up, go back to console.groq.com
- Click your profile icon (top right) → "API Keys"
- Click "Create API Key"
- Copy the key — it looks like
gsk_... - Store it somewhere safe (we'll use it in Python)
Important: Never share this key publicly. If you accidentally push it to GitHub, regenerate it immediately.
Step 3: Install Python & Groq Library
Open your terminal (Terminal on Mac, Command Prompt on Windows, or any terminal on Linux).
Check if Python is installed:
python3 --version
If you see a version (e.g., "Python 3.10.0"), you're good. If not, download Python from python.org.
Now install the Groq library:
pip install groq
This takes 10–30 seconds. You'll see output like:
Successfully installed groq-0.4.1 ...
Step 4: Your First Groq Request (Python)
Create a new file called groq_test.py:
from groq import Groq

# Initialize the Groq client with your API key
client = Groq(api_key="YOUR_API_KEY_HERE")

# Create a chat completion
response = client.chat.completions.create(
    model="mixtral-8x7b-32768",
    messages=[
        {"role": "user", "content": "What is the fastest programming language?"}
    ],
    max_tokens=256
)

# Print the response
print(response.choices[0].message.content)
Replace YOUR_API_KEY_HERE with your actual API key from Step 2.
Run it:
python3 groq_test.py
You'll see the AI's response instantly. That's Groq's speed in action.
Step 5: Understanding the Response
The response object contains:
choices[0].message.content— The actual text responsemodel— Which model was usedusage— Token count (important for budgeting)
Here's a more detailed example:
from groq import Groq

client = Groq(api_key="YOUR_API_KEY_HERE")

response = client.chat.completions.create(
    model="mixtral-8x7b-32768",
    messages=[
        {"role": "user", "content": "Explain quantum computing in 3 sentences"}
    ]
)

# Extract useful data
text = response.choices[0].message.content
tokens_used = response.usage.total_tokens

print(f"Response: {text}")
print(f"Tokens used: {tokens_used}")
Step 6: Multi-Turn Conversations (Chat History)
Groq supports conversations — you can ask follow-up questions and the AI remembers context.
from groq import Groq

client = Groq(api_key="YOUR_API_KEY_HERE")

# Start a conversation
messages = [
    {"role": "user", "content": "I want to learn Python. Where should I start?"}
]

response = client.chat.completions.create(
    model="mixtral-8x7b-32768",
    messages=messages
)

assistant_reply = response.choices[0].message.content
print(f"AI: {assistant_reply}\n")

# Follow-up question
messages.append({"role": "assistant", "content": assistant_reply})
messages.append({"role": "user", "content": "Can you give me a code example?"})

response = client.chat.completions.create(
    model="mixtral-8x7b-32768",
    messages=messages
)

print(f"AI: {response.choices[0].message.content}")
Key: Keep the entire conversation history in the messages list. Groq uses it to understand context.
Step 7: Available Models
Groq supports several models. Each has different speed/intelligence trade-offs:
| Model | Speed | Best For |
|---|---|---|
| mixtral-8x7b-32768 | Ultra-fast | General tasks, coding, fast responses |
| llama2-70b-4096 | Very fast | Complex reasoning, long responses |
| llama-3.1-8b-instant | Fastest | Simple questions, real-time apps |
| llama-3.1-70b-versatile | Fast | Balanced speed + quality |
For beginners, use mixtral-8x7b-32768. It's fast and smart.
To switch models, just change the model parameter:
response = client.chat.completions.create(
    model="llama-3.1-70b-versatile",  # Different model
    messages=[{"role": "user", "content": "Your question here"}]
)
Step 8: Error Handling
APIs sometimes fail. Here's how to handle errors gracefully:
from groq import Groq

client = Groq(api_key="YOUR_API_KEY_HERE")

try:
    response = client.chat.completions.create(
        model="mixtral-8x7b-32768",
        messages=[
            {"role": "user", "content": "Hello, Groq!"}
        ],
        max_tokens=256
    )
    print(response.choices[0].message.content)
except Exception as e:
    print(f"Error: {e}")
Common errors:
- Invalid API key: "Authentication failed" — check your key
- Rate limited: "Too many requests" — you've exceeded free tier limits
- Invalid model: "Model not found" — check spelling
- Network error: "Connection refused" — check your internet
Step 9: Real-World Example — AI Code Generator
Here's a practical example: an AI that explains code:
from groq import Groq

client = Groq(api_key="YOUR_API_KEY_HERE")

code_snippet = """
def fibonacci(n):
    if n <= 1:
        return n
    return fibonacci(n-1) + fibonacci(n-2)
"""

prompt = f"Explain this Python code:\n{code_snippet}"

response = client.chat.completions.create(
    model="mixtral-8x7b-32768",
    messages=[
        {
            "role": "user",
            "content": prompt
        }
    ]
)

explanation = response.choices[0].message.content
print(explanation)
Run this and Groq will explain the Fibonacci function instantly.
Step 10: Monitoring Your Usage
Your free tier includes 30,000 requests per day. To check usage:
- Go to console.groq.com
- Navigate to Usage or Dashboard
- See how many requests you've made today
Each request counts as 1, regardless of response length. 30,000 is a lot — you'd have to make 346 requests per second to hit the limit in a day.
Paid Plans (When You Need More)
If you exceed 30,000 requests/day, upgrade:
- Pro: $5/month for 10M requests/month (unlimited)
- Custom: Contact sales for enterprise needs
For most beginners and small projects, the free tier is enough.
Common Issues & Fixes
"ModuleNotFoundError: No module named 'groq'"
- You haven't installed the Groq library. Run:
pip install groq
"Invalid API key"
- Check that your key is correct and hasn't expired
- Go to console.groq.com to regenerate if needed
"Too many requests"
- You've hit the 30,000 request/day limit
- Upgrade to paid, or wait until tomorrow
"Connection timeout"
- Check your internet connection
- Groq's servers might be down (rare)
"Response takes too long"
- Groq is usually instant, but very long responses can take 2–5 seconds
- Use
max_tokens=256to force shorter responses
Next Steps
Now that you can use Groq, try:
- Build a chatbot — Store messages, keep conversation history
- Generate code — Ask Groq to write Python, JavaScript, etc.
- Summarize text — Give Groq a long article, get a summary
- Translate languages — Groq handles translation well
- Use it in a web app — Backend Python + frontend JavaScript
For web applications, check out Groq's JavaScript client too (npm install groq).
Key Takeaways
- Groq is fast — 10x faster than typical API alternatives
- Free tier: 30,000 requests/day (very generous)
- Install:
pip install groq - Basic flow: Initialize client → create message → get response
- Models: mixtral-8x7b recommended for beginners
- No credit card needed — free tier works forever at these limits
FAQ
Is Groq really free?
Yes. 30,000 free requests per day, forever. No credit card required.
How fast is Groq?
Typically 50–200ms per response. OpenAI and Claude API usually take 1–5 seconds.
Can I use Groq in production?
Yes, it's reliable and has 99.9% uptime SLA.
Which model should I use?
Start with mixtral-8x7b-32768. It's fast and intelligent.
Can I run Groq offline?
No, Groq is cloud-only. You need internet to use it.
Is my data private?
Groq uses standard encryption. Check their privacy policy for details.
Can I use Groq for commercial projects?
Yes, you can build and sell products using Groq's API.
What's the difference between Groq and running models locally?
Groq is faster and easier (cloud), but costs money. Local models are free but slower and require powerful hardware.
Can I cancel anytime?
Yes. If you upgrade to paid, you can cancel without penalty.
What payment methods does Groq accept?
Credit cards (Visa, Mastercard, Amex). See console.groq.com for details.

Alex the Engineer
•Founder & AI ArchitectSenior software engineer turned AI Agency owner. I build massive, scalable AI workflows and share the exact blueprints, financial models, and code I use to generate automated revenue in 2026.
Related Articles

How to Start an AI-Assisted Resume Writing Side Hustle in 2026 (Beginner's Guide)
A step-by-step guide to using AI resume tools to offer a paid resume and cover letter writing service — what to charge, which tools to use, and how to find your first clients.

How to Build and Sell AI Voice Receptionists to Local Businesses in 2026
A beginner's guide to building AI voice agents that answer business phone calls — the tools to use, what to charge, and how to find your first client.

How to Make Money on Fiverr with AI Tools in 2026: 7 Gigs You Can Start This Week
Discover 7 real Fiverr gigs you can launch using free and low-cost AI tools in 2026 — no experience required. Real pricing data, step-by-step setup, and tools that actually work.