ComfyUI Beginner Guide 2026: Install, Setup & First Image
Learn how to install ComfyUI in 2026 — step-by-step for Windows and Mac. This beginner guide covers the node system, first workflow, Flux models, and ComfyUI Manager.

ComfyUI is the most powerful free tool for running AI image generation locally — but its node-based interface confuses nearly every beginner on first launch.
This guide skips the intimidation and gets you to your first generated image step by step, whether you're on Windows or Mac.
What Is ComfyUI?
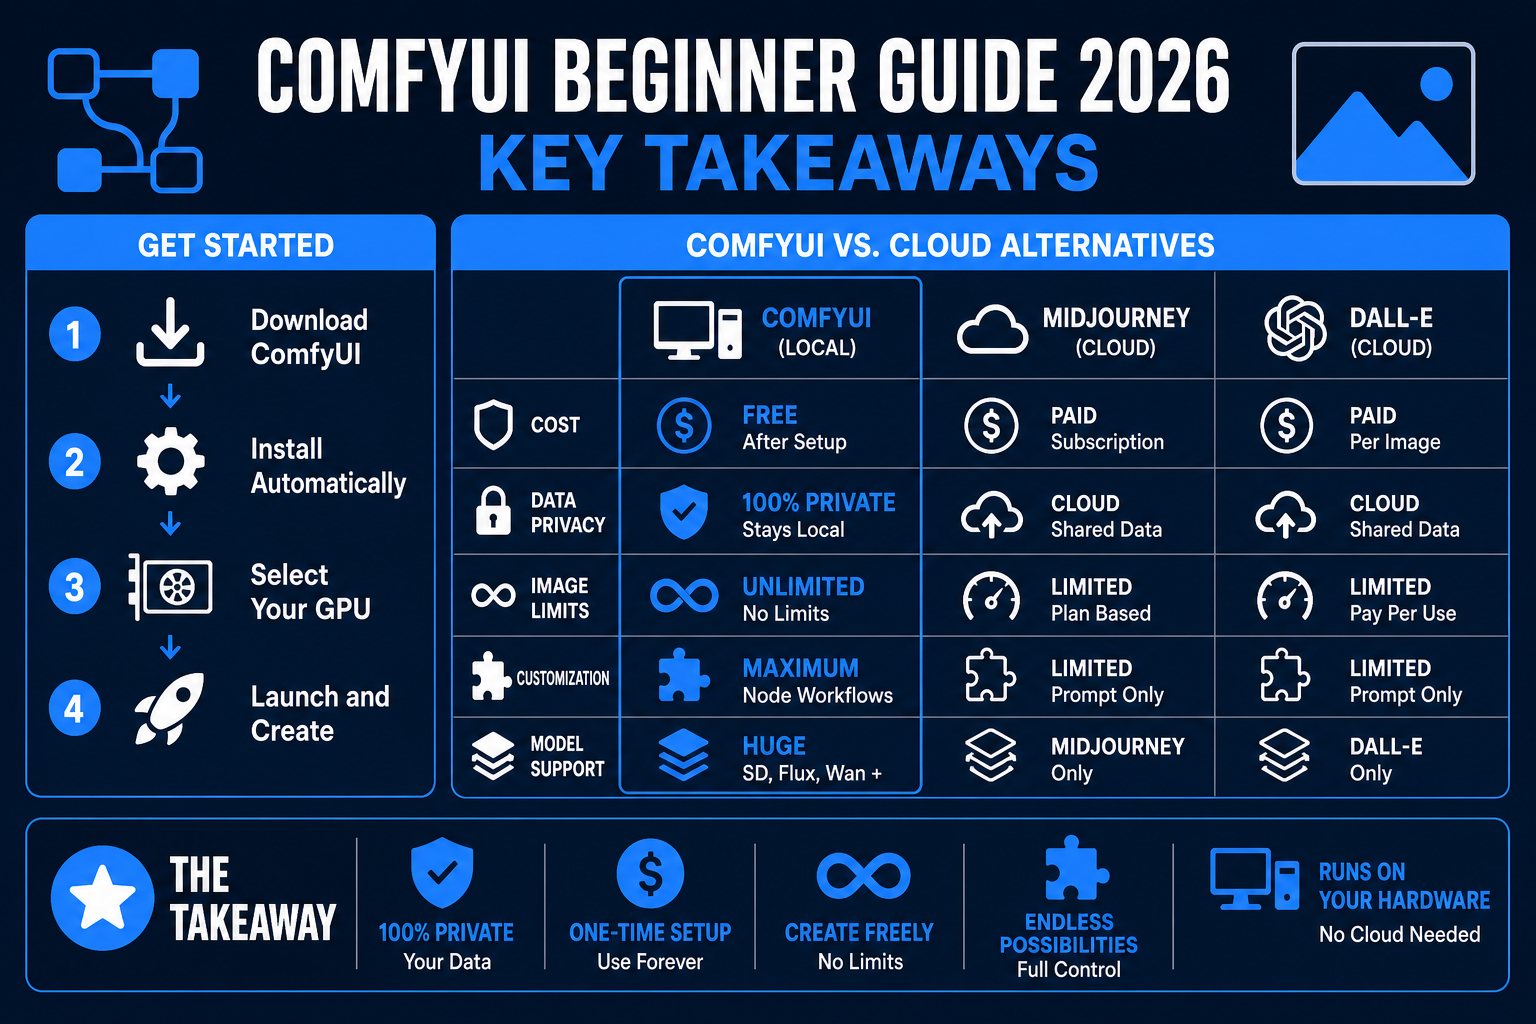
ComfyUI is a free, open-source interface for running AI image generation models on your own computer — no subscriptions, no cloud API costs, no limits on how many images you create.
Unlike Midjourney (cloud-only, subscription) or DALL-E (API costs per image), ComfyUI runs entirely on your hardware. The images it generates stay on your machine and cost you nothing after setup.
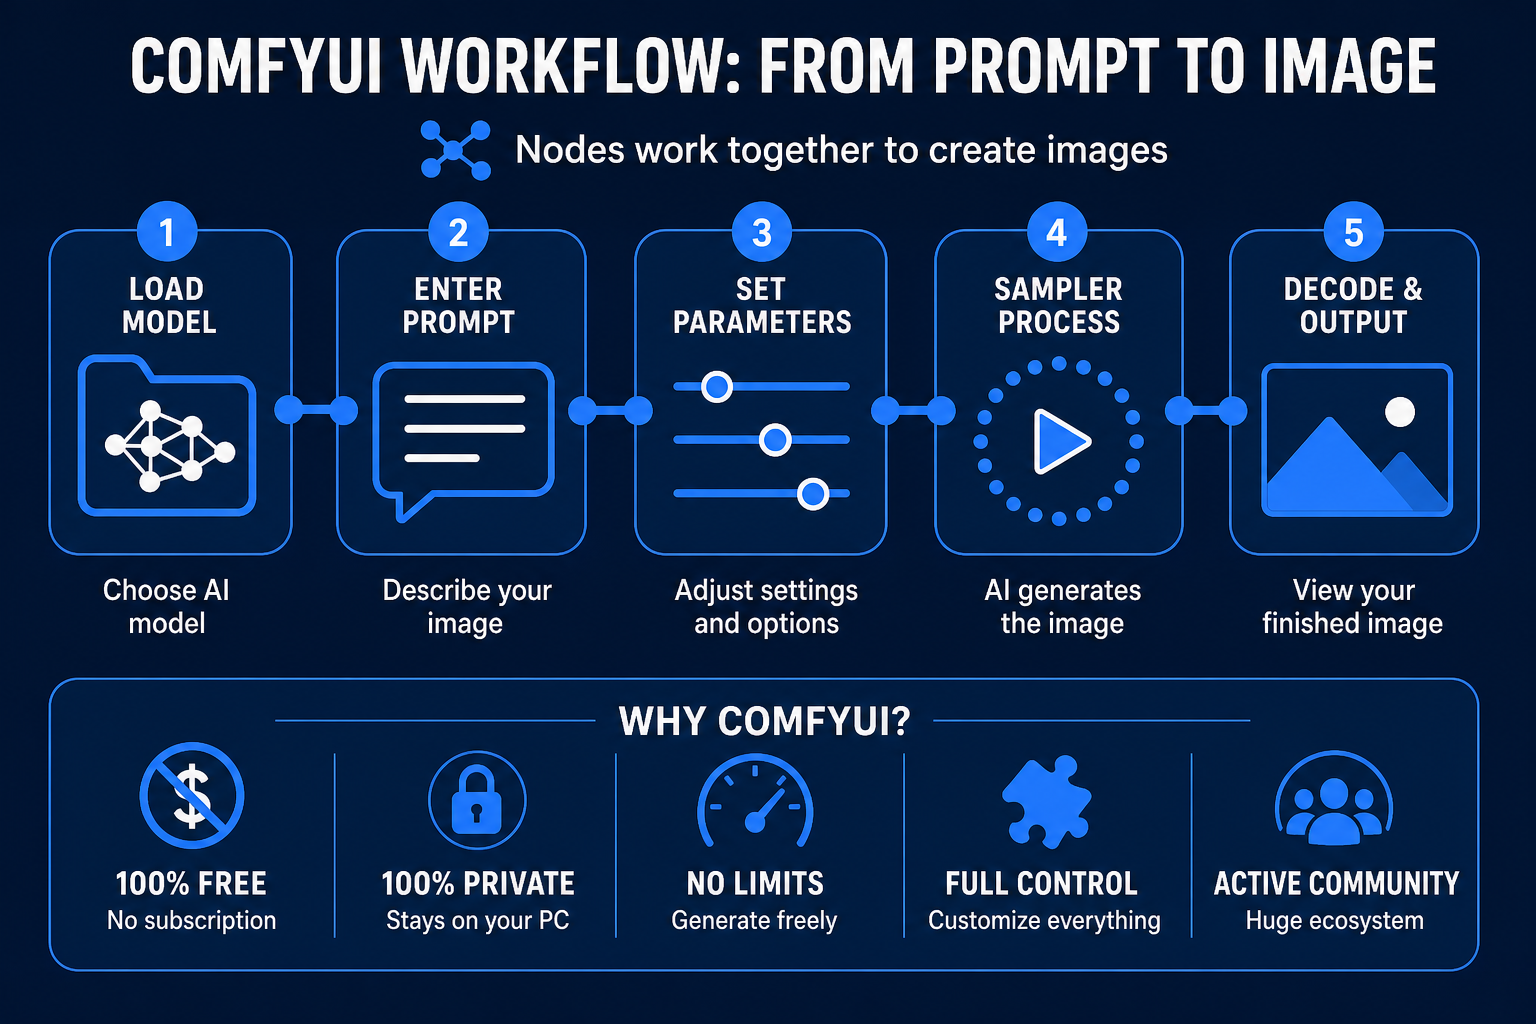
It's built around a node-based workflow system. Instead of a single text box, you connect blocks together — a model loader, a text prompt encoder, a sampler, a decoder — and the chain of nodes produces your image. This sounds complex, but it means you can build any workflow imaginable, from simple text-to-image to video generation, inpainting, and LoRA-based style transfers.
ComfyUI supports:
- Stable Diffusion (all versions: SD 1.5, SDXL, SD3)
- Flux (including Flux.1 Dev and Flux.1 Schnell)
- Wan 2.1 (video generation)
- LTX Video
- Hundreds of community model variants via HuggingFace and Civitai
System Requirements
Windows:
- NVIDIA GPU with at least 4 GB VRAM (8 GB recommended for Flux)
- 16 GB RAM minimum
- 10–20 GB free disk space (for models)
- Can run on CPU, but extremely slow — a single image takes 10+ minutes
Mac:
- macOS 12.3 or higher (for Apple Silicon MPS acceleration)
- Apple Silicon (M1, M2, M3, M4) recommended — Intel Macs will be very slow
- 16 GB unified memory minimum; 32 GB for Flux models
- Python 3.10 or later
Need to check your GPU's VRAM before starting? See our VRAM guide for a full breakdown by model size.
Installation: Windows (Desktop App — Easiest Method)
The ComfyUI Desktop app launched in 2025 and is the cleanest way to get started on Windows. It installs like a normal application — no Python, no command line required.
Step 1: Go to comfy.org/download and download the Windows installer.
Step 2: Run the installer. It sets up Python, dependencies, and the application automatically.
Step 3: Launch ComfyUI Desktop. On first run, click Get Started.
Step 4: Select your GPU type. Choose Nvidia GPU for automatic CUDA configuration, or CPU if you have no discrete GPU.
Step 5: Choose an install location — remember this path, you'll add model files here later.
Step 6: Click Install. The app downloads remaining components (~2–3 GB).
Once installed, the app opens to the main ComfyUI canvas with a default text-to-image workflow already loaded.
Installation: Windows (Portable Zip — Alternative)
If you prefer not to use the Desktop app, or you want finer control over the installation:
Step 1: Download the standalone portable version from the ComfyUI GitHub releases.
Step 2: Install 7-Zip if you don't have it. Right-click the downloaded .7z file → Extract Here.
Step 3: Download a model checkpoint. For beginners, Dreamshaper 8 is a good starting point. Place the downloaded .safetensors file in:
ComfyUI_windows_portable\ComfyUI\models\checkpoints
Step 4: Launch ComfyUI by double-clicking run_nvidia_gpu.bat (or run_cpu.bat if no GPU). This opens a browser tab at localhost:8188.
Installation: Mac
Mac installation requires using the Terminal. If you haven't used Terminal before, see our Terminal beginner guide first — it covers everything you need.
Step 1: Install Homebrew if you don't have it:
/bin/bash -c "$(curl -fsSL https://raw.githubusercontent.com/Homebrew/install/HEAD/install.sh)"
Step 2: Install required tools:
brew install cmake protobuf rust python@3.10 git wget
Step 3: Clone ComfyUI from GitHub:
git clone https://github.com/comfyanonymous/ComfyUI
cd ComfyUI
Step 4: Create a virtual environment and install dependencies:
python3 -m venv venv
./venv/bin/pip install torch torchvision torchaudio
./venv/bin/pip install -r requirements.txt
Step 5: Download a model checkpoint and place it in the models/checkpoints folder inside your ComfyUI directory.
Step 6: Start ComfyUI:
./venv/bin/python main.py
ComfyUI opens at localhost:8188 in your browser.
Understanding the Node System
When ComfyUI first loads, the canvas shows a default workflow with several connected boxes. Here's what they do:
Load Checkpoint — loads your AI model file. This is where you select which model you want to use for generation.
CLIP Text Encode (x2) — converts your text prompt (and negative prompt) into numbers the model understands. One node is for what you want in the image; one is for what you want excluded.
KSampler — the core generation node. It runs the diffusion process, turning random noise into your image over multiple steps. Key settings here: steps (more = higher quality, slower), cfg (how strictly the model follows your prompt), and sampler_name (the algorithm used).
VAE Decode — converts the internal representation of the image into actual pixel data you can see.
Save Image — saves the generated image to your disk.
How to run: Click the Queue Prompt button at the top right. ComfyUI processes the nodes in sequence and displays the output image on the right side of the canvas.
Installing ComfyUI Manager
ComfyUI Manager is the essential extension that lets you install custom nodes (community-built add-ons) with one click. Without it, you'd need to manually clone Git repositories.
Install ComfyUI Manager:
- Open Terminal (Mac) or Command Prompt (Windows), navigate to your ComfyUI folder
- Run:
cd custom_nodes
git clone https://github.com/ltdrdata/ComfyUI-Manager
- Restart ComfyUI
After restart, a Manager button appears in the top-right corner. From here you can:
- Browse and install community node packs
- Update all installed nodes at once
- Enable/disable nodes without deleting them
- Install missing nodes detected in shared workflows
Running Flux Models (2026 Standard)
Flux.1 is the 2026 standard for high-quality image generation — sharper details, better text rendering, and more accurate anatomy than earlier Stable Diffusion models.
What you need for Flux.1 Schnell (faster, open license):
flux1-schnell.safetensorscheckpointclip_l.safetensorsandt5xxl_fp8_e4m3fn.safetensorsCLIP modelsae.safetensorsVAE- Minimum 8 GB VRAM (12 GB recommended)
Download model files from HuggingFace and place them in the corresponding models/ subfolders.
For Flux, use a Flux-specific workflow template — the default SD workflow won't work. The ComfyUI Desktop app includes Flux workflow templates in the Templates Gallery.
ComfyUI vs Automatic1111: Which Should You Use?
| Feature | ComfyUI | Automatic1111 |
|---|---|---|
| Interface | Node-based (visual) | Traditional form UI |
| Learning curve | Steeper initially | Easier to start |
| Workflow flexibility | Unlimited | High but fixed |
| VRAM efficiency | Excellent | Good |
| Flux support | Native, excellent | Limited |
| Community extensions | Largest ecosystem | Large ecosystem |
| Best for | Power users, advanced workflows | Beginners wanting simpler UI |
If you're just starting with AI image generation, Automatic1111 has a gentler learning curve. If you want the most capability and plan to use newer models like Flux, ComfyUI is where to start.
Common First-Run Errors
"No models found" — you haven't placed a model file in the models/checkpoints folder. Download a .safetensors file and add it there, then restart ComfyUI.
"CUDA out of memory" — your GPU doesn't have enough VRAM for the model. Try adding --lowvram to your launch command, or use a smaller model.
Blank canvas on Mac — Apple Silicon requires the --force-fp16 flag. Add it when launching: ./venv/bin/python main.py --force-fp16
Nodes appear red/disconnected — you're loading a workflow that requires custom nodes you haven't installed. Use ComfyUI Manager → Install Missing Nodes to fix automatically.
FAQ
Q: Is ComfyUI free?
A: Yes, completely free and open source. The models you download are also free (with varying licenses). Flux.1 Schnell is Apache 2.0 (fully open). Flux.1 Dev requires a non-commercial license.
Q: Can I run ComfyUI without a GPU?
A: Yes, on CPU only — but expect 10–30 minutes per image rather than seconds. For regular use, a dedicated GPU (NVIDIA on Windows/Linux, Apple Silicon on Mac) is effectively required.
Q: Does ComfyUI work on Windows 11?
A: Yes, fully supported. The Desktop app is the easiest option on Windows 11.
Q: What's the difference between ComfyUI Desktop and the portable version?
A: Desktop is a proper installed application with a GUI setup wizard. The portable version is unzipped and run via a batch file. Desktop is easier; portable gives more control over file locations.
Q: What's ComfyUI Manager?
A: An extension that adds a package manager to ComfyUI. It lets you install, update, and remove community-built nodes without using the command line.
Q: What are the best models for beginners in 2026?
A: Dreamshaper 8 (photorealistic, forgiving), Juggernaut XL (SDXL, portrait quality), or Flux.1 Schnell (2026 quality standard, requires 8 GB VRAM).
Q: Can I use ComfyUI on a laptop?
A: Yes — if your laptop has a dedicated NVIDIA GPU with 4+ GB VRAM or is an Apple Silicon Mac. Gaming laptops with RTX 3060 or higher run ComfyUI well.

Alex the Engineer
•Founder & AI ArchitectSenior software engineer turned AI Agency owner. I build massive, scalable AI workflows and share the exact blueprints, financial models, and code I use to generate automated revenue in 2026.
Related Articles

How to Make Money with AI Tools in 2026: 7 Proven Methods for Beginners
New to AI and wondering how to turn it into income? Here are 7 proven methods beginners are using in 2026 — with the exact tools, realistic earnings, and how to start this week.
Krea 2 Review: The AI Image Generator Built From Scratch (2026)
Krea 2 launches today with Raw and Turbo models, open weights, and 2-second generation. This beginner guide covers what it is, how it compares to Midjourney and FLUX, and whether the free plan is worth it.
How to Run GLM-5.2 Locally: Requirements, Quants, and Alternatives (2026)
Want to run GLM-5.2 locally? This guide covers the real VRAM and RAM requirements, Unsloth quantization options, and what to do if you don't have 245GB of RAM.