How to Run Local AI in VS Code for Free (2026 Guide)
VS Code 1.120 now has a built-in Agents window for local AI — but there's also a completely free path using Ollama + Continue.dev. This guide covers both, step by step.

VS Code just added a dedicated Agents window in version 1.120 — and you can connect it to local AI models running on your own machine. No API key. No cloud subscription required (for the model itself). Your code never leaves your computer.
There are actually two ways to do this, and they suit different setups:
- Path A — Completely free: Ollama + Continue.dev extension (no GitHub Copilot plan needed)
- Path B — Copilot-tier: Ollama + VS Code's native Copilot Chat (requires GitHub Copilot subscription, but you use local models so there are no API costs per query)
This guide covers both from scratch. If you've never run a local AI model before, check our LM Studio tutorial and terminal beginners guide first — this guide assumes you're comfortable running a few terminal commands.
What You'll Need
Before anything else, check your hardware. Local AI models run in RAM or VRAM. The minimum you want for a usable experience:
- 8 GB RAM — runs smaller models (3B–7B parameters) comfortably
- 16 GB RAM — runs mid-tier models (13B–14B) smoothly
- GPU with 8+ GB VRAM — dramatically faster than CPU-only
Not sure how much VRAM your machine has? Read our how to check VRAM for AI guide before picking a model.
Software requirements:
- VS Code installed (version 1.113+ for Ollama, 1.120+ for Agents window)
- Ollama — the local model runner that both paths use
- For Path A: Continue.dev extension (free)
- For Path B: GitHub Copilot Chat extension (requires paid Copilot plan)
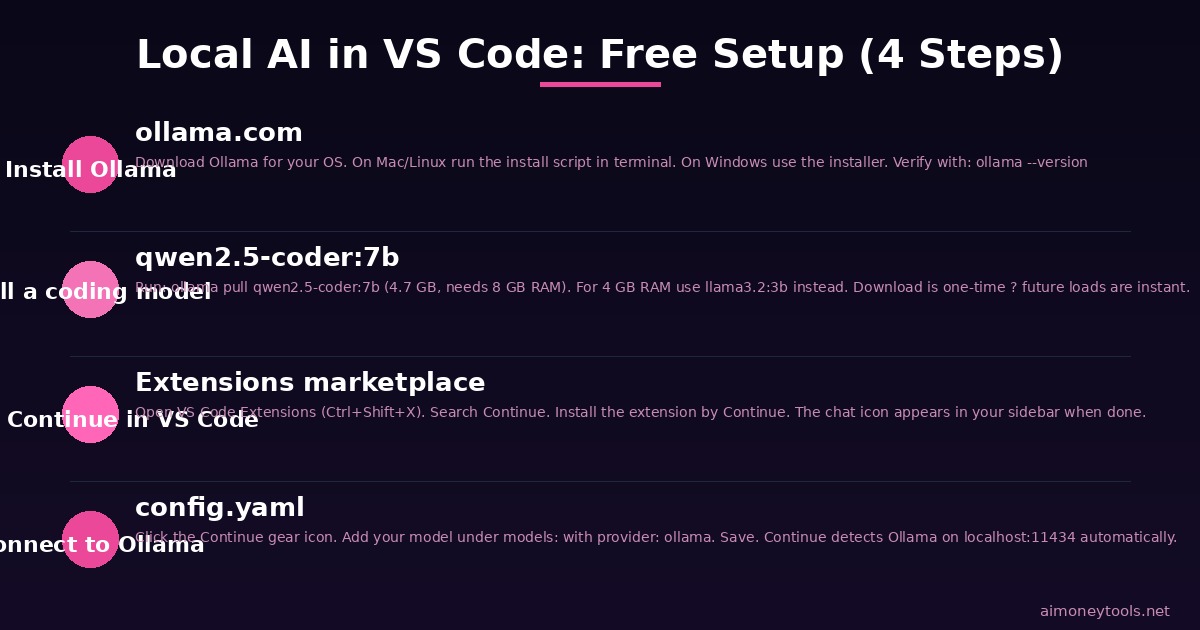
Step 1: Install Ollama
Ollama is the engine that downloads and runs AI models locally. It works on macOS, Windows, and Linux.
macOS / Linux: Open your terminal and run:
curl -fsSL https://ollama.com/install.sh | sh
Windows: Download the installer from ollama.com and run it. Ollama adds itself to your system tray.
Once installed, verify it's running:
ollama --version
You should see a version number. If you see "command not found," revisit our terminal setup guide.
Step 2: Pull a Local Model
Ollama downloads models with a single command. Here are the best options depending on your hardware:
| Model | Size on disk | Min RAM | Best for |
|---|---|---|---|
llama3.2:3b |
~2 GB | 4 GB | Fast responses, general tasks |
qwen2.5-coder:7b |
~4.7 GB | 8 GB | Coding, code completion |
deepseek-coder-v2:16b |
~10 GB | 16 GB | Advanced coding tasks |
llama3.1:8b |
~5 GB | 8 GB | Balanced general use |
To pull a model, run:
ollama pull qwen2.5-coder:7b
This downloads the model to your machine (one-time download). Subsequent loads are instant.
To verify it works:
ollama run qwen2.5-coder:7b
Type a message. If you get a response, Ollama is working. Press Ctrl+D to exit.
Path A: Completely Free — Ollama + Continue.dev
Continue.dev is a free, open-source VS Code extension that acts as an AI coding assistant. It works with Ollama out of the box and gives you both a chat panel and inline code completions — no subscription required.
Install Continue.dev
- Open VS Code
- Go to the Extensions panel (Ctrl+Shift+X)
- Search for "Continue"
- Install the extension by Continue
After installation, a Continue icon appears in your left sidebar.
Connect Continue to Ollama
Open Continue's config file. Click the gear icon in the Continue panel, or navigate to ~/.continue/config.yaml.
Add your Ollama model under the models section:
models:
  - title: qwen2.5-coder 7B (Local)
    provider: ollama
    model: qwen2.5-coder:7b

tabAutocompleteModel:
  title: qwen2.5-coder 7B
  provider: ollama
  model: qwen2.5-coder:7b
Save the file. Continue automatically detects the change.
Using Continue in VS Code
Chat mode: Click the Continue icon in the sidebar to open the chat panel. Select your Ollama model from the dropdown. Ask coding questions, explain code, or get help debugging.
Inline completions: As you type code, Continue suggests completions. Press Tab to accept. Press Esc to dismiss.
Slash commands: In the chat, type /edit followed by your instruction to edit the selected code directly. Type /explain to get an explanation of highlighted code.
Continue works entirely offline once your model is downloaded.
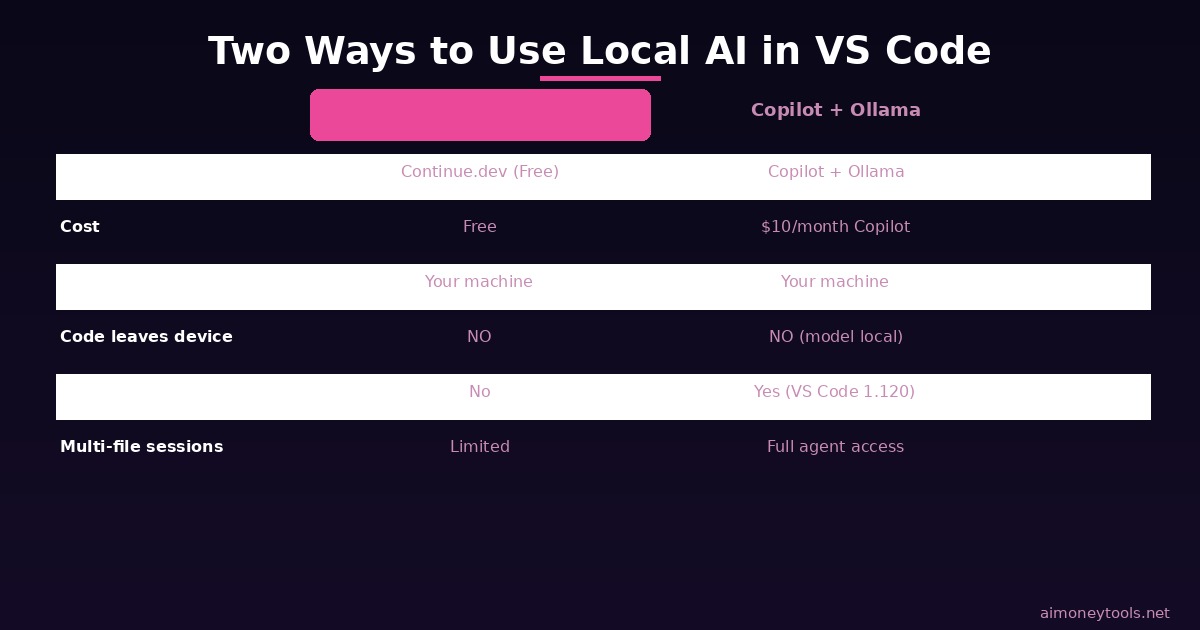
Path B: VS Code 1.120 Agents Window + Ollama (Copilot Tier)
VS Code 1.120 introduced a dedicated Agents window that gives AI sessions a persistent workspace with access to your files, tools, and local models. This path uses Ollama through GitHub Copilot Chat — you still run models locally, but you need a GitHub Copilot subscription to access the chat interface.
Copilot pricing: GitHub Copilot Individual is $10/month or $100/year. The local model integration means your queries don't consume additional API credits — you're just paying for the Copilot feature access.
Setup Steps
1. Ensure VS Code is version 1.120 or later
Check via Help → About in VS Code. If your version is older, update from the VS Code download page.
2. Install GitHub Copilot Chat
Extensions panel → Search "GitHub Copilot Chat" → Install. Sign in with your GitHub account that has Copilot active.
3. Connect Ollama to Copilot Chat
With Ollama running in the background:
- Open the Copilot Chat sidebar (the speech bubble icon in the top right)
- Click the gear/settings icon to open Language Models
- Click Add Models and select Ollama
- Your downloaded Ollama models appear in the list
- Click Unhide next to the models you want to use
4. Use the Agents Window
VS Code 1.120 adds the Agents window (View → Agents or through the Command Palette). This gives your AI session access to your workspace files, terminal, and tools across a full agent session — useful for multi-file changes or longer tasks.
In the chat panel at the bottom, make sure Local is selected to use your Ollama model instead of Copilot's cloud models.
Which Path Is Right for You?
Both paths use the same local models. The choice depends on what you want from the interface:
Use Continue.dev (Path A) if:
- You want zero subscription cost
- You primarily need chat + code completion
- You don't already have GitHub Copilot
Use VS Code Agents Window (Path B) if:
- You already have a GitHub Copilot subscription
- You want the full Agents window for multi-file, multi-tool sessions
- You prefer VS Code's built-in UI over a third-party extension
For pure cost-efficiency, Continue.dev is the clear winner. For VS Code integration depth, the Agents window is more polished now that it's in Stable.
If you want a cloud-based AI assistant with no setup at all — no terminal, no models to download — CustomGPT lets you build AI assistants around your own documents and deploy them in minutes. It's a different use case (document Q&A, customer support bots) but worth knowing about if the local setup feels like too many moving parts.
Best Models for Coding in VS Code
After connecting either path, here's what to actually run:
For code completion and quick help:
qwen2.5-coder:7b — Alibaba's coding-specialized model. Strong at completions, refactoring, and explaining code. Runs well on 8 GB RAM. This is the best default choice for most machines.
For general chat + coding on low-end hardware:
llama3.2:3b — Meta's 3B model. Runs on 4 GB RAM with acceptable quality. Best if your machine struggles with larger models.
For heavy coding work on capable hardware:
deepseek-coder-v2:16b — Excellent code reasoning and explanation. Requires 16 GB RAM. Noticeably better at understanding complex codebases.
For mixed tasks (code + writing + analysis):
llama3.1:8b — A balanced general-purpose model that handles both coding and non-coding queries well.
You can switch models at any time in Continue's config or in the Copilot Chat model picker without restarting VS Code.
Troubleshooting Common Issues
Ollama not found after install: Restart your terminal. On Windows, restart VS Code entirely after installing Ollama.
Model responses are very slow:
You're likely running on CPU only. Check your VRAM with our VRAM guide — if you have a GPU, Ollama should detect it automatically. Running ollama run <model> and checking for "using GPU" in the output confirms it.
Continue not connecting to Ollama:
Make sure Ollama is running (ollama serve in terminal if it stopped). Ollama runs on localhost:11434 by default — Continue expects this port.
Model keeps repeating or producing garbage:
This usually means insufficient RAM. The model is being partially swapped to disk. Try a smaller model (llama3.2:3b instead of 7B).
Related Articles
- LM Studio Tutorial: Run AI Models Locally (2026)
- Terminal Beginners Guide
- How to Check VRAM for AI: Quick Guide
- How to Use AI in Google Sheets (4 Methods)
FAQ
Q: Do I need to pay anything to run local AI in VS Code? A: For Path A (Continue.dev + Ollama), no — both are completely free and open source. The only costs are your hardware (electricity, GPU if you have one). Path B requires a GitHub Copilot subscription (~$10/month) to access the chat interface, even though the models run locally.
Q: Is my code sent to any server when I use local AI in VS Code? A: With Ollama + Continue.dev, your code stays entirely on your machine. Nothing is sent to external servers. With the Copilot + Ollama path, the model runs locally but the VS Code Copilot Chat extension itself may have telemetry — check GitHub's privacy policy for specifics.
Q: What's the minimum computer spec to run local AI in VS Code? A: 8 GB RAM is the practical minimum for a usable experience with a 7B model. A dedicated GPU isn't required but speeds things up dramatically. On 4 GB RAM, stick to 3B models — anything larger will be very slow.
Q: Can I use the same local model in VS Code and other apps at the same time? A: Yes. Ollama runs as a local server on port 11434. Multiple applications can query it simultaneously — VS Code, a web browser via Open WebUI, or any other tool configured to use Ollama. Performance will drop under heavy parallel use on slower hardware.
Q: Which is better for coding: Continue.dev or GitHub Copilot with local models? A: Depends on your workflow. Continue.dev is more customizable and free. GitHub Copilot's Agents window (VS Code 1.120) is more deeply integrated with VS Code's workspace tools and file system. For pure code completion and chat, they're comparable. For multi-step agent tasks that touch multiple files, the Agents window has the edge.
Q: Can I run Kimi K2.6 or other newer models this way? A: Yes, as long as Ollama has the model available. Check ollama.com/search for supported models. Larger models like Kimi K2.6 require significant RAM/VRAM — verify your specs with our VRAM guide first.
Q: Does this work on Windows or only Mac/Linux? A: All three platforms are supported. Ollama has a Windows installer with a system tray app. VS Code and Continue.dev are fully cross-platform. The terminal commands shown in this guide work in PowerShell, Command Prompt, or Windows Terminal.

Alex the Engineer
•Founder & AI ArchitectSenior software engineer turned AI Agency owner. I build massive, scalable AI workflows and share the exact blueprints, financial models, and code I use to generate automated revenue in 2026.
Related Articles

How to Make Money on Fiverr with AI Tools in 2026: 7 Gigs You Can Start This Week
Discover 7 real Fiverr gigs you can launch using free and low-cost AI tools in 2026 — no experience required. Real pricing data, step-by-step setup, and tools that actually work.

How to Make Money with AI Tools in 2026: 7 Proven Methods for Beginners
New to AI and wondering how to turn it into income? Here are 7 proven methods beginners are using in 2026 — with the exact tools, realistic earnings, and how to start this week.
Krea 2 Review: The AI Image Generator Built From Scratch (2026)
Krea 2 launches today with Raw and Turbo models, open weights, and 2-second generation. This beginner guide covers what it is, how it compares to Midjourney and FLUX, and whether the free plan is worth it.