How to Install Python for AI in 2026: The Complete Beginner's Guide
Step-by-step guide to install Python 3.12 for AI on Windows, Mac, and Linux. Covers PATH setup, pip, virtual environments, and the core AI libraries every beginner needs.

Every AI tutorial starts the same way: "First, make sure you have Python installed."
And every beginner gets stuck at that exact step.
Python is not difficult to install — but there are several small mistakes that cause big headaches later: installing the wrong version, skipping the PATH setting, installing libraries globally instead of in a virtual environment, or not knowing which packages to start with.
This guide walks you through the full setup from scratch. By the end, you will have Python 3.12 running on your machine, pip working correctly, a virtual environment ready to go, and the core AI libraries installed. You will also understand why each step matters, not just what buttons to click.
Which Python Version to Install for AI in 2026?
Install Python 3.12. Not 3.13, not 3.11 (unless you have a specific reason), not whatever your operating system ships with by default.
Here is why 3.12 specifically:
The major AI libraries — PyTorch, TensorFlow, HuggingFace Transformers, LangChain, and most others — publish pre-built packages called "wheels" for specific Python versions. As of mid-2026, Python 3.12 has the broadest stable wheel support across all major AI libraries. Python 3.13 was released but many packages have not released stable builds for it yet.
Using a newer but unsupported version means installing from source, dealing with compilation errors, or watching your pip install commands fail with confusing error messages. Save that headache for when you have more experience.
Download Python 3.12 at python.org/downloads — the site auto-detects your OS and suggests the right installer.
Step-by-Step: Install Python for AI

Step 1: Download Python 3.12
Go to python.org/downloads and select Python 3.12.x (choose the most recent patch, e.g. 3.12.9).
- Windows: Download the 64-bit installer (.exe)
- Mac: Download the universal installer (.pkg) — works on both Apple Silicon (M1/M2/M3) and Intel
- Linux: Python usually comes pre-installed. Check your version with
python3 --versionfirst. If it is not 3.12, install via your package manager (see Linux section below)
Step 2: Run the Installer — Do Not Skip the PATH Checkbox
This is the single most common mistake beginners make.
On Windows: when the installer opens, you will see a screen with two options before clicking "Install Now." At the bottom, there is a checkbox that says "Add python.exe to PATH". Check it. Then click Install Now.
Without PATH, your terminal does not know where to find Python. Every python or pip command will return "command not found." You would need to use full absolute paths to run Python, which makes everything significantly harder.
On Mac: the installer handles PATH automatically. Just run the .pkg installer and follow the prompts.
Step 3: Verify the Installation
After the installer finishes, open your terminal:
- Windows: press
Windows + R, typecmd, hit Enter - Mac:
Command + Space, search "Terminal" - Linux: any terminal emulator
Run:
python --version
You should see: Python 3.12.x
If you see an older version or "command not found," see the troubleshooting section below.
Also verify pip (Python's package manager) is working:
pip --version
You should see something like: pip 24.x from ... (python 3.12)
Step 4: Upgrade pip
pip ships with Python but is often not the latest version. Upgrade it immediately:
pip install --upgrade pip
This matters because older pip versions sometimes fail to install packages correctly, especially larger AI libraries with complex dependencies.
Step 5: Create a Virtual Environment
This step is optional in theory. In practice, it is essential — and skipping it causes problems that are annoying to debug later.
A virtual environment is an isolated Python installation for a specific project. Libraries you install inside one environment do not affect others. This means:
- Project A can use PyTorch 2.3 and Project B can use PyTorch 2.5 without conflict
- You can delete an environment and start clean without messing up your other projects
- You avoid the "it worked on my machine" problem when sharing code
Create a virtual environment in your project folder:
python -m venv ai_env
This creates a folder called ai_env with a complete Python installation inside it.
Activate it:
- Windows:
ai_env\Scripts\activate - Mac/Linux:
source ai_env/bin/activate
Your terminal prompt will change to show (ai_env) at the start. Every pip install command you run now installs inside this environment only.
To deactivate when you are done working:
deactivate
If you are new to terminals and need a full walkthrough of how to navigate folders and run commands, check our terminal beginners guide — it covers everything from opening a terminal to running Python scripts step by step.
Step 6: Install Core AI Libraries
With your virtual environment activated, install the libraries you need. Here are the most common ones for AI work in 2026:
For general AI and API access:
pip install openai anthropic
For running and fine-tuning language models locally:
pip install torch transformers accelerate
For data work (used in almost every AI pipeline):
pip install numpy pandas
For building AI agents and chains:
pip install langchain
For working with documents (PDF parsing, etc.):
pip install pypdf2 docx2txt
You do not need all of these at once. Install what your project requires. A good starting point for most beginners is just openai and numpy — that covers calling AI APIs and processing data.
Step 7: Write Your First AI Script
Test that everything works with a minimal script:
import openai

client = openai.OpenAI(api_key="your-api-key-here")

response = client.chat.completions.create(
    model="gpt-4o",
    messages=[{"role": "user", "content": "Say hello in one sentence."}]
)

print(response.choices[0].message.content)
If that runs and returns a response, your Python + AI setup is working correctly.
You can get an OpenAI API key at platform.openai.com. Free credits are available for new accounts.
Python Version Comparison: 3.12 vs 3.13 for AI
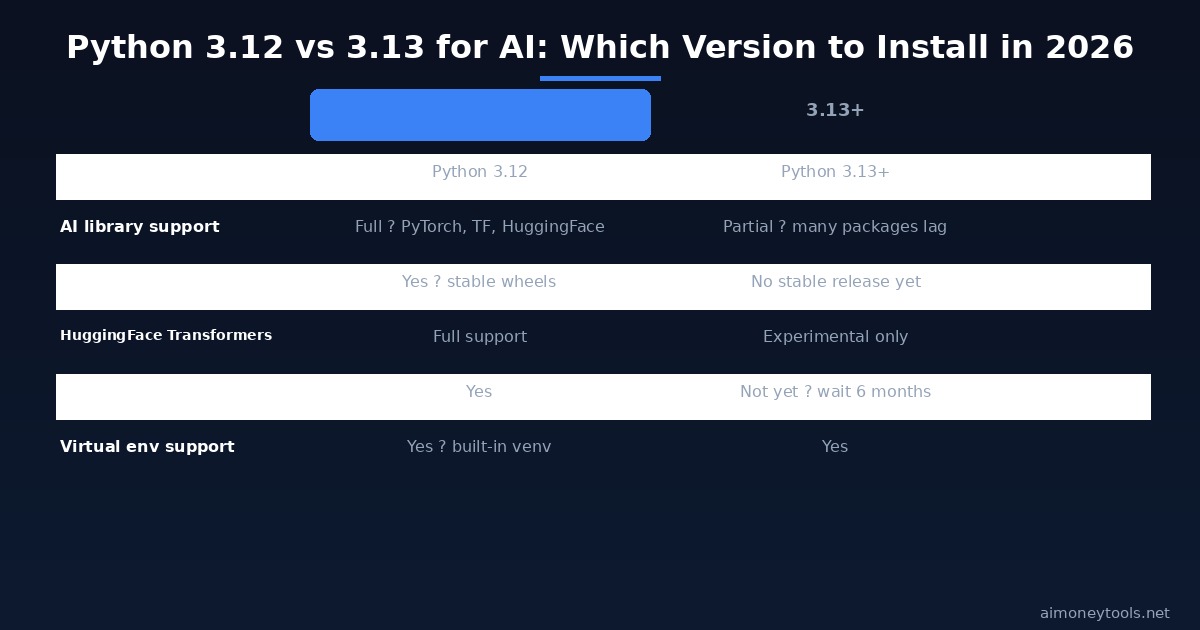
The comparison above is the quick answer: Python 3.12 is the right choice for AI work in 2026. Python 3.13 is faster in some benchmarks, but the AI library ecosystem has not fully caught up. Wait 6–12 months before upgrading an AI project to 3.13.
Installing Python on Windows: Common Issues
"Python is not recognized as an internal or external command" You missed the PATH checkbox during installation. The fix: uninstall Python, re-run the installer, and this time check "Add python.exe to PATH" before clicking Install Now.
Multiple Python versions installed
Use py -3.12 instead of python on Windows to target a specific version. Better: uninstall all versions and do a clean install of 3.12 only.
pip installs to the wrong Python
If you have multiple Python versions, pip may target an older one. Use python -m pip install <package> instead of pip install <package> to ensure you are installing for the correct version.
Installing Python on Mac: Apple Silicon vs Intel
For Mac users with M1, M2, or M3 chips: download the "universal installer" from python.org. This package includes both native ARM64 builds and Intel builds, and macOS automatically runs the right one for your chip.
You do not need Rosetta or any compatibility layer. Python 3.12's macOS builds are fully native on Apple Silicon.
Homebrew users: brew install python@3.12 works and is fine for development. Just note that Homebrew installs to /opt/homebrew/bin/python3.12 rather than the system PATH, so confirm with which python3 that you are pointing to the right version.
Installing Python on Linux
Most Linux distributions come with Python pre-installed. Check your version:
python3 --version
If it is not 3.12, install it via your package manager:
Ubuntu/Debian:
sudo apt update
sudo apt install python3.12 python3.12-venv python3-pip
Fedora:
sudo dnf install python3.12
Arch:
sudo pacman -S python
Note: on Linux, the command is python3 (not python). Create an alias if you want to type python instead: alias python=python3.
What Hardware Do You Need for AI?
For calling AI APIs (OpenAI, Anthropic, Google), any laptop from the last 5 years works fine — these are cloud-side computations.
For running AI models locally on your machine (like Ollama, llama.cpp, or Stable Diffusion), your GPU VRAM is the main constraint. If you are not sure what you have, check our VRAM guide for AI — it shows how to find your specs on Windows, Mac, and Linux and which models your hardware can run.
Frequently Asked Questions
Do I need to know programming to install Python for AI? No. This guide covers the full installation process without programming knowledge. You will need basic terminal familiarity — if you have never used a terminal before, read our terminal beginners guide first. It covers opening terminal, navigating folders, and running commands.
Python 3.12 or 3.13 for AI in 2026? Python 3.12. The major AI libraries (PyTorch, Transformers, LangChain) have full stable support for 3.12. Python 3.13 is faster but many AI packages have not released stable builds for it yet. Switch to 3.13 in late 2026 or early 2027 once the ecosystem catches up.
Do I need to install Python if I use Google Colab or Jupyter Notebooks? No. Google Colab runs Python in the cloud — nothing to install. Jupyter Notebooks run in your browser but do require Python locally. For cloud-based AI work, Colab is an excellent way to get started with zero setup.
What is the difference between python and python3?
On Mac and Linux, python often refers to Python 2 (outdated) while python3 refers to Python 3. Always use python3 on Mac/Linux unless you have specifically set up an alias. On Windows, the installer usually maps python to Python 3 directly.
Why does pip install take so long for AI libraries? PyTorch and similar libraries are large (often 2–5 GB) because they include pre-compiled GPU code. This is normal — the download size is not a sign that something is wrong. Use a fast connection and let it run. You only need to do this once per environment.
Can I use Python for AI without a GPU? Yes. Calling AI APIs (OpenAI, Anthropic, Google Gemini) does not use your GPU at all — the computation happens on their servers. For running models locally, a CPU-only setup works for smaller models (up to about 7B parameters), but is slow. A GPU dramatically speeds up local model inference.
What is the best IDE for writing Python AI scripts? VS Code is the standard for most AI developers. Cursor (an AI-native fork of VS Code) is increasingly popular because it has built-in code completion powered by the same models you are working with. Both are free to start.
Should I install Anaconda instead of Python? Anaconda is a popular Python distribution for data science that comes with many pre-installed packages. It is fine but adds complexity and takes up a lot of disk space. For pure AI/LLM work, a clean Python 3.12 installation with pip and virtual environments is simpler and faster to set up.

Alex the Engineer
•Founder & AI ArchitectSenior software engineer turned AI Agency owner. I build massive, scalable AI workflows and share the exact blueprints, financial models, and code I use to generate automated revenue in 2026.
Related Articles

How to Start an AI-Assisted Resume Writing Side Hustle in 2026 (Beginner's Guide)
A step-by-step guide to using AI resume tools to offer a paid resume and cover letter writing service — what to charge, which tools to use, and how to find your first clients.

How to Build and Sell AI Voice Receptionists to Local Businesses in 2026
A beginner's guide to building AI voice agents that answer business phone calls — the tools to use, what to charge, and how to find your first client.

How to Make Money on Fiverr with AI Tools in 2026: 7 Gigs You Can Start This Week
Discover 7 real Fiverr gigs you can launch using free and low-cost AI tools in 2026 — no experience required. Real pricing data, step-by-step setup, and tools that actually work.