How to Install ComfyUI: Step-by-Step Beginner's Guide for Windows and Mac (2026)
How to install ComfyUI on Windows and Mac in 2026 — step-by-step beginner guide with the portable version, first workflow, and tips for running Stable Diffusion locally for free.

If you've been using Midjourney or DALL-E and you're ready to run AI image generation on your own computer — for free, offline, with full control — ComfyUI is the tool to learn in 2026.
It's the most powerful local image generation interface available right now. It's free, open source, and runs on most modern NVIDIA GPUs (and even on Mac with Apple Silicon). The learning curve looks steep because of the node-based interface, but getting it installed and running your first image takes less than 20 minutes.
This guide covers exactly that: install ComfyUI, load a model, and run your first generation — on both Windows and Mac.
What is ComfyUI?
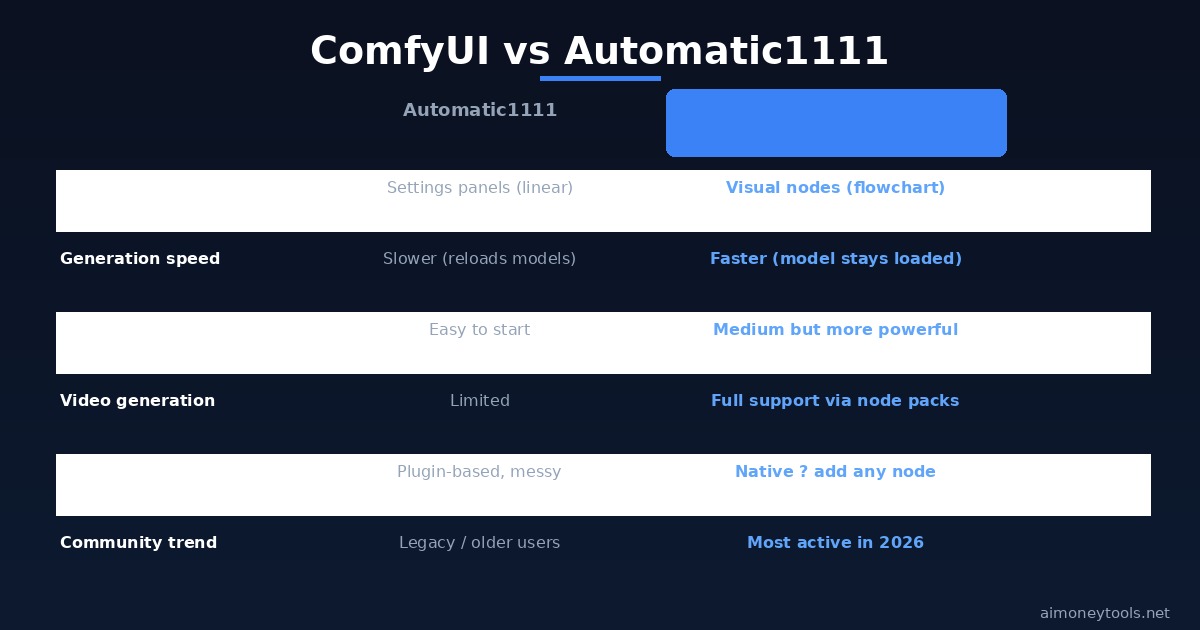
ComfyUI is a node-based GUI (graphical interface) for Stable Diffusion and other local AI image and video generation models. Unlike Automatic1111 (the older standard), ComfyUI shows you the full generation pipeline as a visual flowchart — nodes connected by wires. Each node does one thing: load a model, encode a prompt, sample, decode, or save.
This visual approach makes it:
- Easier to understand what's actually happening in the generation process
- Easier to modify — add ControlNet, change the sampler, inject a LoRA without hunting through settings menus
- More powerful for advanced workflows — video generation (AnimateDiff, CogVideoX), img2img, inpainting, upscaling
It's also significantly faster than Automatic1111 for most workflows because it doesn't re-load models between generations.
What You Need Before Installing
For Windows (NVIDIA GPU — recommended path):
- An NVIDIA GPU with at least 6GB VRAM (8GB+ recommended for good quality)
- 16GB RAM recommended (8GB minimum)
- About 10GB free disk space (more once you start downloading models)
- Windows 10 or 11
For Mac (Apple Silicon — M1/M2/M3/M4):
- Any Apple Silicon Mac (M1 and up)
- 16GB unified memory recommended (8GB works for smaller models)
- macOS 12.3+
Not sure if you have enough VRAM? Read our how to check VRAM for AI guide — it takes 2 minutes.
If you're completely new to using the terminal on Windows, our terminal beginners guide covers the basics.
How to Install ComfyUI on Windows (Portable Version — Easiest)
The portable installer is the fastest way to get started on Windows. No Python setup required.
Step 1: Download the Portable Package
Go to github.com/comfyanonymous/ComfyUI/releases and look for the latest release. Download the file ending in _windows_portable_nvidia.7z (for NVIDIA GPUs) or _windows_portable.7z (for CPU-only, much slower).
Step 2: Extract the Files
You'll need 7-Zip to extract the .7z archive. Right-click the file, select "7-Zip → Extract here." This creates a folder called ComfyUI_windows_portable — put it somewhere you won't accidentally delete it, like C:\AI\ComfyUI\.
Step 3: Download a Model
ComfyUI needs at least one Stable Diffusion model to generate images. Good free starting points:
- SDXL 1.0 base (general quality, 7GB) — from Hugging Face
- Juggernaut XL (photorealistic, 7GB) — popular for realistic images
- Flux Dev (newest, best quality, 16GB, requires 12GB+ VRAM) — the current state of the art for local image generation
Download your chosen .safetensors model file and place it in:
ComfyUI_windows_portable\ComfyUI\models\checkpoints\
Step 4: Launch ComfyUI
Inside the ComfyUI_windows_portable folder, double-click run_nvidia_gpu.bat (or run_cpu.bat if you have no GPU). A terminal window opens — wait about 30 seconds while it loads. When you see To see the GUI go to: http://127.0.0.1:8188, open that URL in your browser.
ComfyUI is now running locally.
How to Install ComfyUI on Mac (Apple Silicon)
Mac installation uses the terminal and Python. It's a few more steps but very reliable on M1/M2/M3/M4.
Step 1: Install Python and Git
If you don't have them:
# Install Homebrew first (paste into Terminal)
/bin/bash -c "$(curl -fsSL https://raw.githubusercontent.com/Homebrew/install/HEAD/install.sh)"

# Then install Python and Git
brew install python git
Step 2: Clone the ComfyUI Repository
git clone https://github.com/comfyanonymous/ComfyUI
cd ComfyUI
Step 3: Install Dependencies
pip3 install torch torchvision torchaudio --index-url https://download.pytorch.org/whl/cpu
pip3 install -r requirements.txt
On Apple Silicon, PyTorch uses Metal Performance Shaders (MPS) for GPU acceleration automatically — you don't need to install anything extra.
Step 4: Add a Model
Download a compatible .safetensors model and place it in:
ComfyUI/models/checkpoints/
For Mac with 16GB+ RAM, SDXL 1.0 works well. For 8GB RAM, use SD 1.5 models (~2GB) for better performance.
Step 5: Launch
python3 main.py
Then open http://127.0.0.1:8188 in your browser.
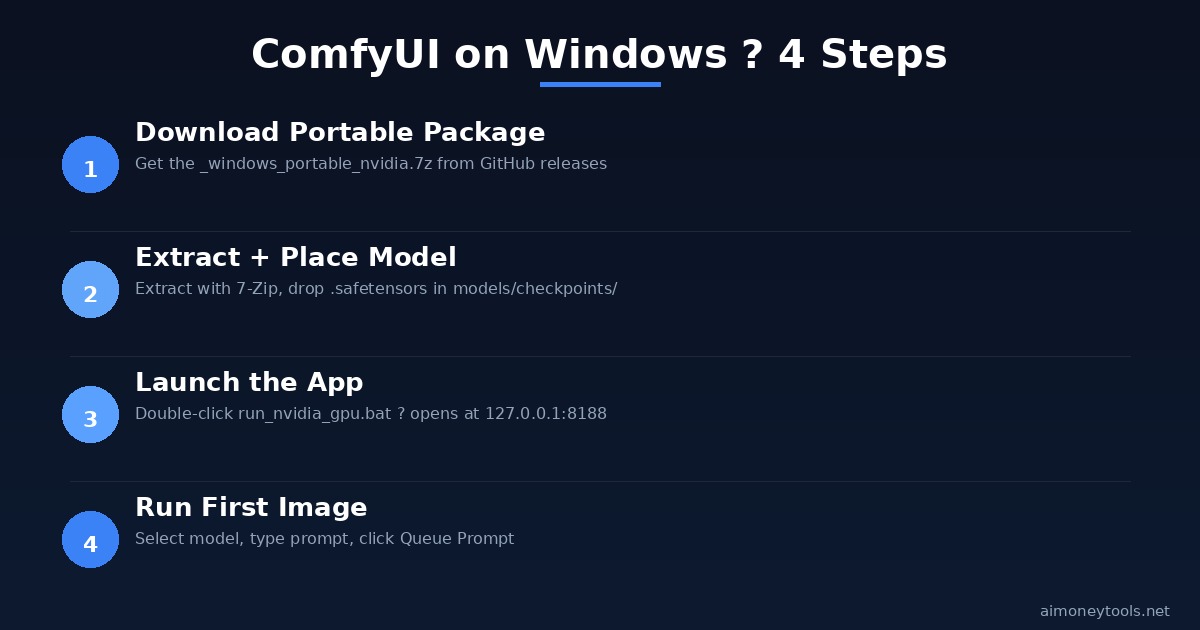
Running Your First Generation
When ComfyUI opens in your browser, you'll see the default workflow — a set of connected nodes. It looks complex, but the core path is just four steps: load model → encode prompt → sample → decode → save.
Your first generation:
- In the Load Checkpoint node, click the dropdown and select your downloaded model
- In the positive text node (CLIP Text Encode), type a prompt — e.g.,
a golden retriever on a mountain, cinematic lighting, photorealistic - In the negative text node, type:
blurry, low quality, watermark - Click Queue Prompt (bottom right)
Your first image generates in 30–90 seconds depending on your GPU. The output saves automatically to ComfyUI/output/.
Key Settings to Know
Steps: Controls how many denoising iterations run. More = better quality but slower. 20–30 is the sweet spot for most models.
CFG Scale: How closely the image follows your prompt. 7 is standard. Higher (10+) makes it more literal but can cause artifacts.
Sampler: The algorithm used for generation. euler_a and dpmpp_2m are popular starting points. Try different ones — results vary noticeably.
Resolution: SDXL works best at 1024×1024. SD 1.5 works best at 512×512 or 768×768. Using the wrong resolution for a model produces distorted results.
Generating Videos with ComfyUI (Advanced)
One reason ComfyUI is trending in June 2026 is its video generation support. With the right nodes (CogVideoX, AnimateDiff, or Wan 2.1 workflow packs), ComfyUI can generate short video clips locally from text prompts on a consumer GPU.
The Twitter community is particularly active around this — RTX 3090 users are generating 3-5 second clips that "would have needed a Hollywood render farm 3 years ago."
This is advanced territory — it requires additional node packs installed via ComfyUI Manager — but the same installation you just completed is the foundation.
Frequently Asked Questions
Is ComfyUI free? Yes. ComfyUI is fully open source (MIT license), free to download, and runs entirely on your local hardware. You pay for electricity and the hardware you already own. There's no subscription, no per-image fee, and no internet connection required once it's running.
Does ComfyUI work on AMD GPUs? Yes, via the ROCm backend on Linux. Windows support for AMD is improving but less stable than NVIDIA. If you're on AMD on Windows, using the CPU mode or a cloud-based ComfyUI (like ThinkDiffusion) may be easier until AMD Windows support matures.
How much VRAM do I need?
Minimum: 4GB VRAM (SD 1.5 models). Recommended: 8GB+ (SDXL, most Flux models). Best: 12GB+ (Flux Dev at full quality, video generation). ComfyUI has a --lowvram flag that allows running on 4–6GB cards with some speed penalty.
What's the difference between ComfyUI and Automatic1111? Automatic1111 (A1111) is older and more beginner-friendly with a traditional settings-panel interface. ComfyUI uses a node-based workflow that's harder to start but more powerful and faster. Most advanced Stable Diffusion users have switched to ComfyUI. If you're just starting, the portable version makes ComfyUI easier than A1111 was in 2023.
Can I use ComfyUI on a laptop? Yes, if your laptop has a dedicated NVIDIA GPU with 6GB+ VRAM. Gaming laptops (RTX 3060/4060 class) work well. Integrated graphics (Intel HD / AMD Radeon integrated) will be very slow but technically function. Apple Silicon laptops (M1 and up) are excellent for ComfyUI due to unified memory sharing between CPU and GPU.
Where do I download Stable Diffusion models? The main sources are Hugging Face and CivitAI. Hugging Face has official model releases; CivitAI has community fine-tunes and LoRAs. Always check the license before downloading, especially for commercial use.

Alex the Engineer
•Founder & AI ArchitectSenior software engineer turned AI Agency owner. I build massive, scalable AI workflows and share the exact blueprints, financial models, and code I use to generate automated revenue in 2026.
Related Articles

What is OpenRouter? The Beginner's Guide to One API for Every AI Model (2026)
OpenRouter explained for beginners — one API key to access 400+ AI models including GPT, Claude, Gemini, DeepSeek, and Llama 4. Free tier, pricing, and how to start without coding.

Google's AI Brain Drain: Nobel Scientist John Jumper Joins Anthropic (What It Means for Claude)
Nobel Prize winner John Jumper just left Google DeepMind for Anthropic — days after Gemini's co-lead left for OpenAI. Here's why the world's best AI scientists are abandoning Google, and what it means for the AI tools you use.